Tailscale in the Homelab — Remote Access Without Opening Ports

In this post
Anyone who runs a homelab — or even a single Raspberry Pi hosting services — eventually hits the same obstacle: how do you access those devices from outside the local network? The classic answer involves opening ports on the router, setting up port forwarding, dealing with dynamic IPs via DDNS, and hoping no bot discovers that SSH port exposed to the internet. It works, but the attack surface grows with every open port, and the maintenance becomes a silent headache that only shows up when something breaks.
Traditional VPNs like OpenVPN and raw WireGuard solve part of the problem but bring their own complications. You need to maintain a publicly accessible VPN server — which brings us right back to exposing at least one port — plus manage keys, certificates, and routing configurations on each device. For someone who manages infrastructure professionally during the day, the last thing you want is to replicate that complexity in the homelab at night.
The ideal scenario would be something that connects all devices as if they were on the same local network, regardless of their physical location, without requiring any open ports on the router, without depending on a static IP, and without needing a server exposed to the internet. That is exactly what Tailscale does — and the free plan covers practically everything a homelab needs.
What is Tailscale and how does it work#
Tailscale is a mesh VPN built on top of WireGuard — the protocol that has become the benchmark for modern VPNs by being fast, lightweight, and having a codebase small enough to be auditable. The difference is that Tailscale eliminates all the manual configuration that WireGuard normally requires: key exchange, endpoint definition, routing rules, and NAT traversal are all handled by the platform.
The architecture has three main components. The first is the coordination server, maintained by Tailscale, which acts as a rendezvous point where devices exchange public keys and discover how to reach each other. The second is the clients installed on each device, which establish direct WireGuard tunnels between themselves. The third is the NAT traversal mechanism, which allows two devices behind different routers — each with its own NAT — to establish a peer-to-peer connection without needing open ports. When a direct connection is not possible, traffic passes through DERP relays maintained by Tailscale, but that is the exception rather than the rule.
One detail worth emphasizing: the coordination server never sees the traffic between devices. It only facilitates the exchange of metadata so the nodes can find each other — all actual traffic is end-to-end encrypted by WireGuard, directly between devices. The official documentation covers the architecture in detail for those who want to dig deeper.
The practical result is that each device on the network gets a fixed IP in the 100.x.x.x range (the CGNAT range reserved for this type of use), accessible from any other device on the same tailnet — the name Tailscale gives to your private network. It doesn’t matter if the laptop is at a café, the server is in a datacenter, and the Raspberry Pi is behind a home router: for all practical purposes, they are on the same LAN.
graph TD
    CS["🔑 Coordination server\nPublic key and endpoint exchange"]

    subgraph HOME["🏠 Home network — NAT"]
        MAC["💻 Mac"]
        RPI["🍓 Raspberry Pi"]
        LXC["📦 LXC Container"]
    end

    subgraph DC["🏢 Datacenter — NAT"]
        VPS["🖥️ VPS"]
        SRV["🖥️ Server"]
    end

    DERP["☁️ DERP Relay\nFallback when P2P fails"]

    CS -. "metadata" .-> HOME
    CS -. "metadata" .-> DC
    CS -. "metadata" .-> DERP

    MAC <== "WireGuard tunnel\npeer-to-peer" ==> VPS
    LXC <== "WireGuard tunnel\npeer-to-peer" ==> SRV
    RPI <== "WireGuard tunnel\npeer-to-peer" ==> VPS

    MAC <-. "via relay" .-> DERP
    DERP <-. "via relay" .-> SRV
Installation and configuration#
Tailscale has packages for virtually everything that runs Linux, as well as macOS, Windows, iOS, and Android. The download page lists all options. Here we will cover the three most common homelab scenarios: Linux (Debian/Ubuntu), macOS, and LXC containers on Proxmox.
Creating an account#
Before installing any client, create an account at login.tailscale.com. Tailscale does not have its own signup — authentication is done via Google, Microsoft, GitHub, or Apple. Choose whichever provider you prefer and the tailnet is created automatically. No credit card or plan selection is required — the Personal (free) plan is already active with support for 3 users and 100 devices.
Linux (Debian/Ubuntu)#
The installation follows the standard pattern of adding the official repository and installing via apt. Tailscale’s convenience script handles everything in a single line:
curl -fsSL https://tailscale.com/install.sh | sh
After installation, enable and start the daemon:
sudo systemctl enable --now tailscaled
Then authenticate the device:
sudo tailscale up
The command prints a URL in the terminal. Open it in a browser, log in with the same account created earlier, and the device appears on the tailnet. From that moment on, it already has a 100.x.x.x IP accessible by any other node on the network.
To confirm the status:
tailscale status
macOS#
There are two options: the App Store app and the CLI package via Homebrew. The App Store app is the most practical option — install it, log in, and the Mac appears on the tailnet. For those who prefer the command line:
brew install tailscale
Start the daemon:
sudo brew services start tailscale
Authentication follows the same flow:
tailscale up
The command prints a URL in the terminal. Open it in a browser, log in with the same account created earlier, and the device appears on the tailnet.
LXC Containers (Proxmox)#
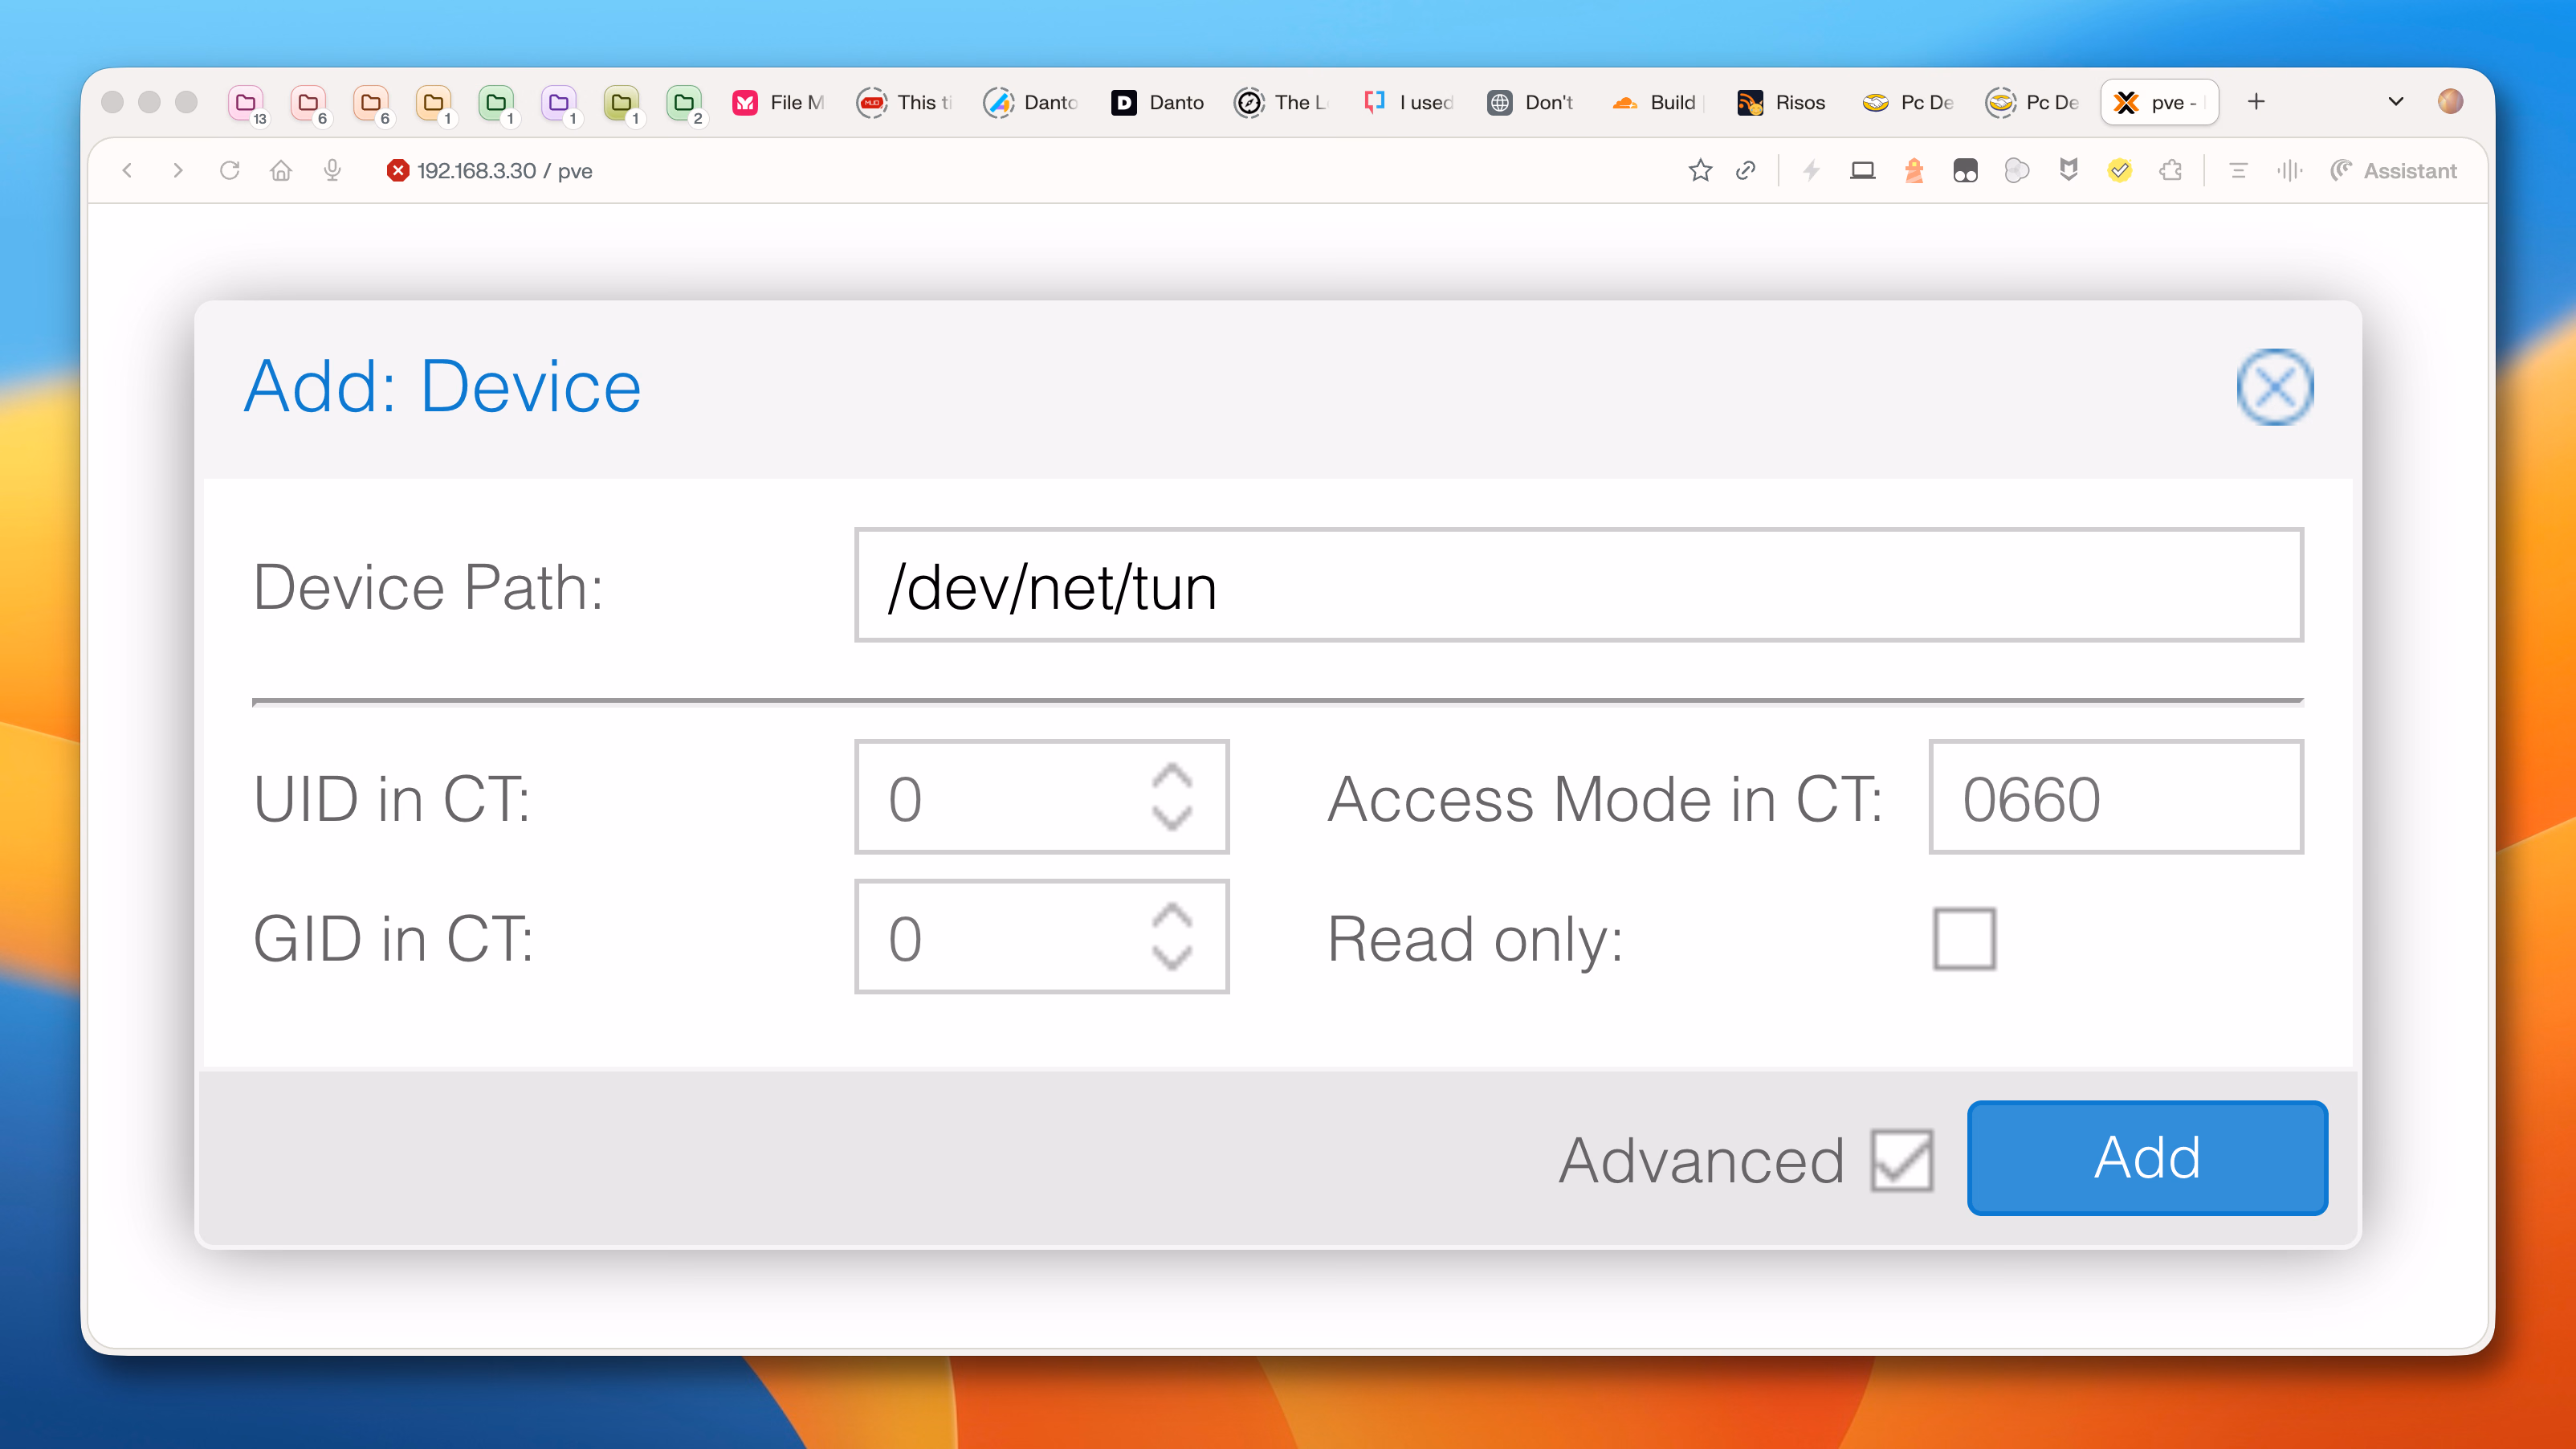
Unprivileged LXC containers on Proxmox do not have access to the /dev/net/tun device by default, and Tailscale needs this device to create the network tunnel. There are two ways to fix this.
Via the web interface (Proxmox 8+): go to the container’s Resources tab, click Add, select Device Passthrough, and enter dev/net/tun in the Device Path field.
Via the command line, on the Proxmox host, edit the container’s configuration file (replacing <CTID> with the actual ID):
nano /etc/pve/lxc/<CTID>.conf
Add the following two lines at the end:
lxc.cgroup2.devices.allow: c 10:200 rwm
lxc.mount.entry: /dev/net/tun dev/net/tun none bind,create=file
Restart the container for the change to take effect. Inside it, the installation follows the standard Linux process — curl -fsSL https://tailscale.com/install.sh | sh, then sudo systemctl enable --now tailscaled and tailscale up.
Tailscale also offers a userspace networking mode that dispenses with /dev/net/tun access and requires no changes to the Proxmox configuration. The tradeoff is that in this mode Tailscale does not create a real network interface — it operates as a local SOCKS5/HTTP proxy, and each application that needs to reach the tailnet must be configured to route through the proxy. For a container running a single service that is already set up to use a proxy, this may be acceptable. But in homelab scenarios, where the goal is precisely for all services to see the 100.x.x.x IPs transparently — as if they were on the same LAN — the TUN device is the most practical option: two lines in the container’s configuration file and tailnet access works for any process, with no additional adjustments.
Testing connectivity#
With at least two devices on the tailnet, the next step is to confirm they can see each other. The tailscale status command lists all nodes on the network with their respective IPs and status:
tailscale status
The output shows something like:
100.116.82.20   mac-janio            janio@       macOS   -
100.85.47.3     fuqu                 janio@       linux   -
100.97.12.58    rpi                  janio@       linux   -
To test connectivity between two nodes, use tailscale ping instead of the conventional ping:
tailscale ping 100.116.82.20
tailscale ping operates over Tailscale’s own protocol and, in addition to confirming that the connection works, shows whether it is direct (peer-to-peer) or going through a DERP relay. A response like pong from mac-janio (100.116.82.20) via 100.116.82.20:41641 in 12ms indicates a direct connection — the ideal scenario. If via DERP(...) appears, traffic is passing through an intermediary server, which works but with higher latency.
Traditional ping (ICMP) also works between devices that are not unprivileged containers. Inside an LXC container on Proxmox, ping fails with Operation not permitted because the container does not have the CAP_NET_RAW capability required to create raw sockets — this does not indicate a network problem. TCP and UDP connectivity works normally, and tailscale ping is the reliable way to validate communication in any scenario.
Practical use cases#
The tailnet works as a virtual LAN that follows you wherever you go. This opens possibilities that go beyond simply “accessing a server from outside.” Some concrete scenarios for homelab users:
SSH without a public IP#
The most immediate use case. With Tailscale installed on the server and the laptop, SSH access works via the 100.x.x.x IP regardless of where you are — without opening port 22 on the router, without DDNS, without exposing anything to the internet. For those who only need SSH without installing a VPN client on every machine, SSH-J.com is a lighter alternative that uses only OpenSSH. The server can be behind CGNAT, change IPs every time the router restarts, and nothing changes. The command remains ssh user@100.x.x.x, as if the server were right next to you. Tailscale also offers Tailscale SSH, which allows authentication via Tailscale identity without manually managing SSH keys — useful for those who want to simplify things even further.
Accessing LM Studio remotely#
Anyone who runs local models on LM Studio knows that the inference server listens by default on localhost:1234. With Tailscale on the Mac running LM Studio and on the container or VPS that needs to consume the API, just configure LM Studio to listen on 0.0.0.0:1234 and point the requests to the Mac’s Tailscale IP — for example, http://100.116.82.20:1234/v1/chat/completions. The connection is end-to-end encrypted by WireGuard, without needing to expose the LM Studio port to the local network or the internet.
Sharing internal services#
A Raspberry Pi running AdGuard Home, a container with Immich for photos, a monitoring dashboard with Grafana — all these services become accessible from any device on the tailnet via the 100.x.x.x IP and the service port. No reverse proxy, no certificates, no external DNS configuration. For those who want to go a step further, Tailscale allows sharing devices with other users without them needing to be on the same account, which makes it easy to give family members or colleagues access to specific services.
Subnet router — accessing the entire local network#
Instead of installing Tailscale on every device on the home network, it is possible to configure a single node as a subnet router. This node acts as a gateway between the tailnet and the local network: when you are away from home and try to access an IP on the home network — a printer, a NAS, a camera — the traffic goes through the WireGuard tunnel to the subnet router, which forwards the packet to the destination device and returns the response through the same path. The destination device does not even need to know that Tailscale exists.
The prerequisite is that the node chosen as subnet router must always be on, which makes a Raspberry Pi or a lightweight LXC container more suitable for this role than a desktop or laptop. The configuration requires a single command on that node:
sudo tailscale up --advertise-routes=192.168.3.0/24
Then the route needs to be approved in Tailscale’s admin panel to take effect. From that point on, any device on the tailnet can reach IPs on the 192.168.3.0/24 network as if it were connected to the home router.
MagicDNS#
Memorizing 100.x.x.x IPs is not practical when the tailnet starts to grow. MagicDNS solves this by automatically assigning readable names to each device — the machine’s hostname becomes a DNS record accessible by any other node on the tailnet. Instead of ssh janio@100.85.47.3, the command becomes ssh janio@fuqu, using the container’s hostname directly.
MagicDNS is enabled by default on new tailnets. To verify or enable it manually, go to the DNS page in the admin panel and confirm the option is turned on. Each device gets a name in the format hostname.tailnet-name.ts.net — the full suffix works from anywhere, and the short hostname works when the tailnet’s search domain is configured on the operating system, which Tailscale does automatically in most cases.
In practice, this means internal service URLs become stable and memorable. LM Studio on the Mac becomes accessible at http://mac-janio:1234, AdGuard Home on the Raspberry Pi at http://rpi:3000, and so on. If a device changes its IP on the tailnet (which rarely happens but can occur), the name keeps pointing to the right place without manual adjustment.
For scenarios where the default names are not enough, the DNS panel also allows configuring split DNS — forwarding queries for specific domains to internal resolvers, useful when the tailnet coexists with existing DNS infrastructure.
When Tailscale is not the best option#
Tailscale solves the problem of connecting distributed devices without complex configuration very well, but there are scenarios where it does not fit — or where another tool makes more sense.
High-throughput traffic between servers. Tailscale adds WireGuard encapsulation overhead and, depending on the path, traffic may pass through a relay. For database replication between datacenters or massive file transfers between servers that are already on the same provider’s private network, a direct connection (VPC peering, provider private network) will always be faster and more efficient.
Exposing services to the public. Tailscale creates private networks — it connects authenticated devices, it is not a substitute for a reverse proxy or CDN. If the goal is to publish a website or API to the internet, tools like Cloudflare Tunnel, Caddy, or Nginx with a Let’s Encrypt certificate remain the way to go.
Environments requiring full control-plane auditing. Tailscale’s coordination server is proprietary and runs on their infrastructure. Traffic between devices is end-to-end encrypted and never passes through Tailscale’s servers (except when using DERP relays), but the coordination metadata — which devices exist, which public keys, which IPs were assigned — is under their custody. For organizations with regulatory requirements demanding full sovereignty over this type of data, Headscale (covered in the next section) is the alternative.
Protocols that depend on multicast. The tailnet does not support UDP multicast — protocols like mDNS, SSDP, and DLNA do not work between devices connected only through Tailscale. Automatic discovery of printers, Chromecast, and Bonjour services will not happen over the tailnet. Direct access to these devices still works via IP, but automatic discovery depends on the local network.
Networks with more than 3 users on the free plan. The Personal plan supports up to 3 users and 100 devices. For larger teams without a budget for paid plans, Headscale with its own authentication removes this limitation.
Headscale — the self-hosted alternative#
Headscale is an open-source reimplementation of Tailscale’s coordination server. It replaces only the control plane — the part that manages public keys, assigns IPs, and defines the network boundaries. The clients remain the official Tailscale ones, which means the experience on the end device is identical: same commands, same interface, same WireGuard protocol underneath.
The difference is where the control plane runs. Instead of relying on Tailscale’s infrastructure, Headscale runs on any Linux server — a cheap VPS, a container in the homelab, a dedicated machine. All network coordination is under your control, with no user limitations and no dependency on an external service.
Installation is simple — it is a single Go binary with no heavy dependencies. The official documentation covers initial configuration, user creation, and device registration. The authentication flow changes: instead of logging in with Google or GitHub on the Tailscale website, devices authenticate directly against your Headscale server, using pre-generated keys or OIDC if you have an identity provider configured.
For those already using Tailscale who want to migrate, the transition is relatively smooth — just point the clients to the new coordination server with the --login-server flag. Tailscale itself maintains compatibility with Headscale and works with the project’s maintainers when making changes to the clients that could affect the alternative server’s operation.
The tradeoff is maintenance. Tailscale as a service is “install and forget” — control plane updates, availability, backups, and monitoring are their responsibility. With Headscale, all of that falls on you. For a personal homelab where Tailscale’s free plan already covers everything, Headscale adds complexity without practical gain. It makes more sense when the motivation is sovereignty over coordination data, when the 3-user limit of the free plan becomes a problem, or when the philosophy of not depending on SaaS is a priority.
Free plan vs. paid — what changes#
Tailscale’s Personal plan is free indefinitely, with no credit card and no trial gimmicks. What it includes covers the vast majority of homelab scenarios: up to 3 users, 100 devices, unlimited subnet routers, MagicDNS, basic ACLs (based on admin and member autogroups), and end-to-end encryption — the same foundations as the paid plans.
Personal Plus costs US$ 5/month and increases the limit to 6 users and 100 devices. The practical difference from the free plan is only the number of users — useful for those who want to give access to family members without sharing the same account.
The commercial plans (Starter at US$ 6/user/month, Premium at US$ 18/user/month, and Enterprise with pricing on request) enter different territory: granular ACLs with named groups and users, integration with identity providers like Okta and Azure AD, audit logging, SSH session recording, and priority support. These are features aimed at teams and organizations — if the tailnet is personal or for a small homelab, they are unlikely to justify the cost.
In practice, the relevant question for someone setting up a homelab is simple: how many people need access? If the answer is “just me” or “me and one or two other people,” the free plan has no functional limitation that gets in the way. The 100 devices are more than enough even for ambitious homelabs, and the network features — direct tunnels, subnet routing, MagicDNS, exit nodes — are all available. Tailscale as a product was designed so that the free plan is genuinely usable, not a crippled free sample that pushes you toward an upgrade.
Sysadmin, 53, Brazilian working from home for the world. Manages Linux servers, LXC containers, and cats that won't get off the keyboard.